

Help Page
Registration
We will explain how to register for Packetsbase.
Login
We will explain how to log in and other related information.
Dashboard
We will explain how to use the dashboard.
Address Screen
We will explain how to use the address screen.
About Packets
We will explain about packets.
Filter
We will explain how to use filters.
API Publication
We will explain how to use API publication.
Limits and Contracts
We will explain limits and contract details.
Terms of Service
These are the terms of service for this service.
Registration
We will explain how to register for Packetsbase.
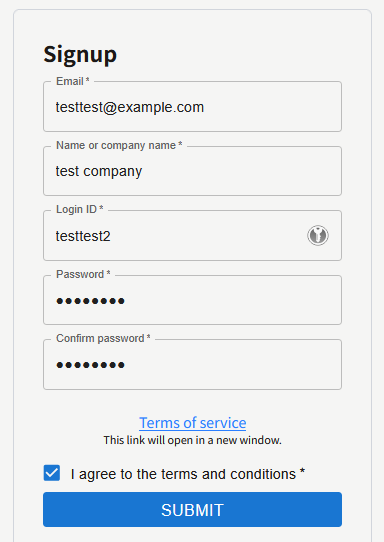
How to Register
To register for Packetsbase, click the "New Registration" button from the login page.
In principle, one account can be created per person. Multiple accounts cannot be used by one person using multiple email addresses.
-
Enter the required information in the registration form.
-
Email Address:
Enter an email address that has not been registered yet. A confirmation email will be sent, so please enter a correct email address. -
Name/Company Name:
Enter the name/company name of the person creating the account. -
Login ID:
Enter a login ID that has not been registered yet. Use lowercase letters, numbers, hyphens, and underscores, and enter at least 8 characters.
The login ID will not be displayed publicly.
Once set, the login ID cannot be changed. Also, please note that the same login ID cannot be used again even if deleted.
-
Password:
Enter at least 8 characters using alphanumeric symbols. -
Password Confirmation:
Confirm that the passwords match by entering it again.
-
Email Address:
- Click the "Register" button.
-
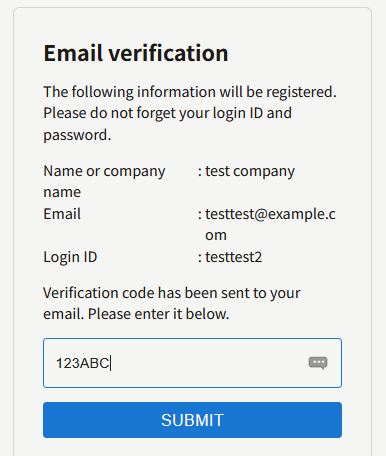
A confirmation code will be sent to the email address entered in the registration form, so enter the confirmation code.
-
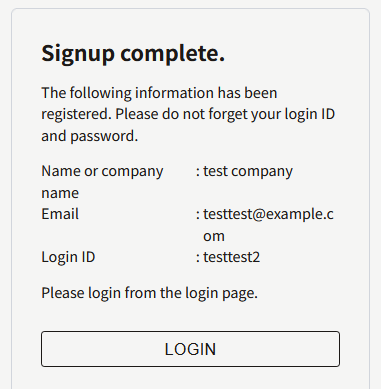
Once the email address is confirmed, registration will be completed.
Login
We will explain how to log in to Packetsbase.
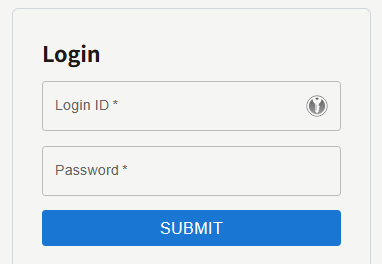
How to Login
On the login screen, enter your registered login ID and password, then click the "Submit" button.
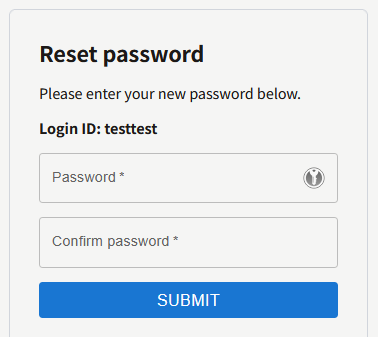
If You Forgot Your Password
If you have forgotten your password, you can reset it using your registered email address.
- On the login screen, click "Forgot Password".
-
On the screen below, enter your login ID and registered email address, then click the "Submit" button.
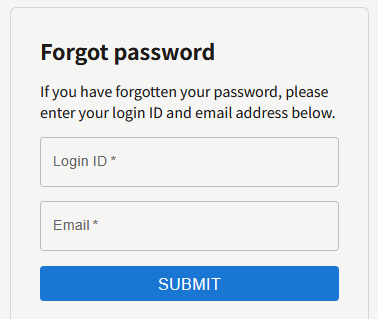
-
An email with a password reset URL will be sent to your registered email address, so reset your password.
Dashboard
We will explain how to use the dashboard.
Screen Description
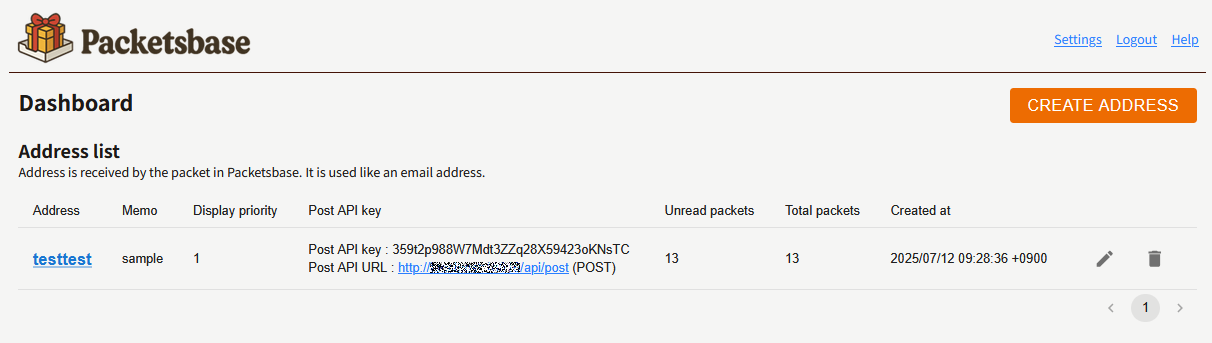
- Click the logo in the upper left to go to this dashboard page.
- Click "Settings" in the upper right to change email address or password, or view logs.
- Click "Logout" in the upper right to log out.
- Click "Create Address" on the right to create a new address.
- The address list is displayed below.
About Addresses
An address is the destination for receiving emails. It is treated the same as an email address in email systems.
One address can be registered per login ID. Additional addresses require a separate monthly fee.
If more addresses are registered than the contract allows, addresses will be deactivated from the lower display order until the contract is added (packets and other data remain saved. Also, public APIs are managed separately, so they follow that system).
Creating Addresses
Addresses can be created by clicking the "Create Address" button on the right.
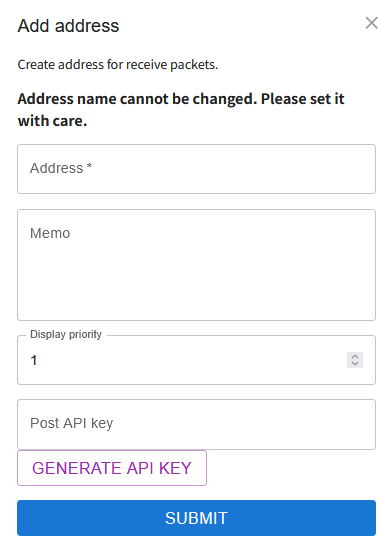
-
Address Name:
You can use lowercase letters, numbers, hyphens, and underscores.
The address name is used when receiving packets but is not displayed outside of Packetsbase.
Once set, the address name cannot be changed. Also, please note that the same address name cannot be used again even if deleted. -
Memo:
You can enter a memo for the address.
-
Display Order:
You can sort them in ascending order by number.
-
Post API Key:
This is the authentication key used to send packets from this address via API.
-
Click the "Submit" button to create the address.
-
Click the "✕" in the upper right to close the dialog box and cancel.
Editing Addresses
Addresses can be edited by clicking the "pen" icon on the right of the address list.
Deleting Addresses
Addresses can be deleted by clicking the "trash" icon on the right of the address list. Even if you delete an address, the same address name cannot be used again.
Address Screen
We will explain how to use the address screen.
Screen Description
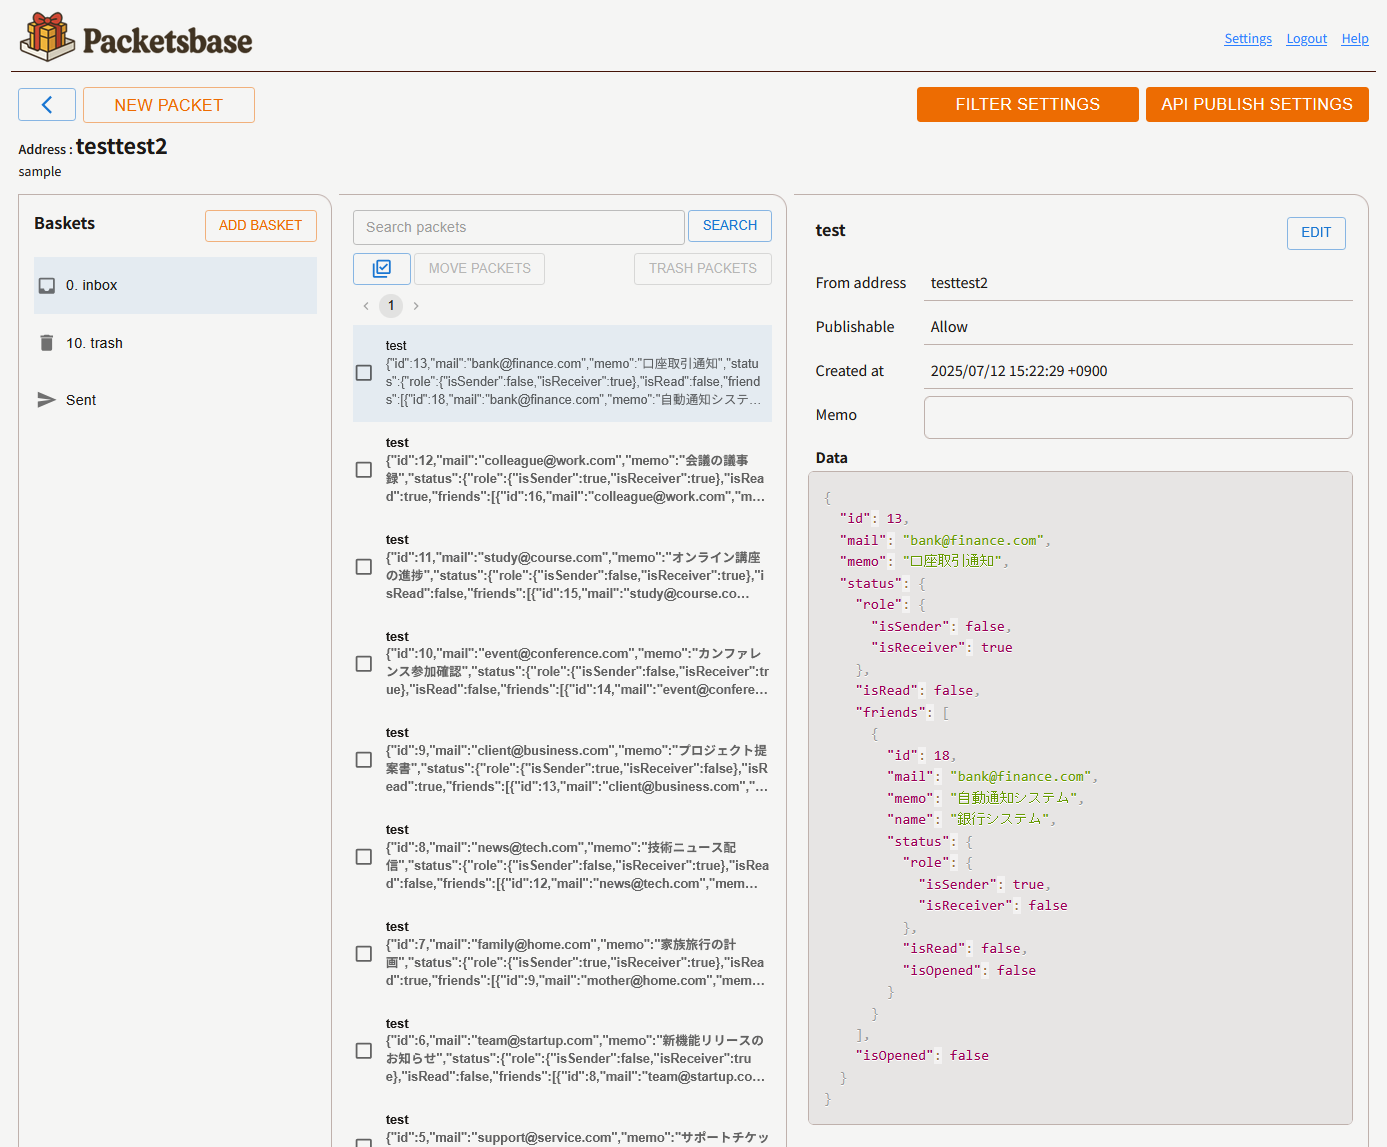
- Click the "<" button on the left to return to the dashboard.
- Click the "New Packet" button on the left to create a new packet. Packets will be in JSON format.
- Click the "Filter Settings" button on the right to move to the settings screen for automatically distributing emails to baskets when received.
- Click the "API Publication Settings" button on the right to move to the settings screen for publishing baskets as APIs.
- The basket list is displayed in the left frame below. Click the "Add Basket" button to create a new basket.
-
The packet list is displayed in the center frame below.
Enter text in the search area to filter packets.
Click the "✅" button to select all displayed packets.
Click "Move Packets" or "Move Packets to Trash" to move selected packets.
- Packet details are displayed in the right frame below.
About Search Queries
Search queries for filtering packets include the following. Use "&" as a separator, and spaces cannot be included.
-
Example: product info&company
- When searching titles and memos, enter keywords directly.
- You can narrow down search conditions by separating them with "&".
-
Example: opened・unopened・publishable・unpublishable
- "opened" can filter read packets.
- "unopened" can filter unread packets.
- "publishable" can filter publishable packets.
- "unpublishable" can filter non-publishable packets.
-
Example: $.status.role.isSender==true
- When searching data, enter in JSONPath format.
- The left side "$.status.role.isSender" part can specify the packet data target in JSONPath format.
- "==" indicates equality with the right side content. Specifying "!=" can filter non-equal items.
About Baskets
- "inbox", "trash", and "sent" are special baskets. They cannot be edited. Also, they cannot be published as APIs.
- "inbox" is the basket that is automatically assigned when no filter is specified during email reception.
- "trash" represents the trash.
- "sent" allows you to reference packets sent in the past.
-
When you add a basket, that basket can be published as an API or edited. Up to 9 baskets can be added.
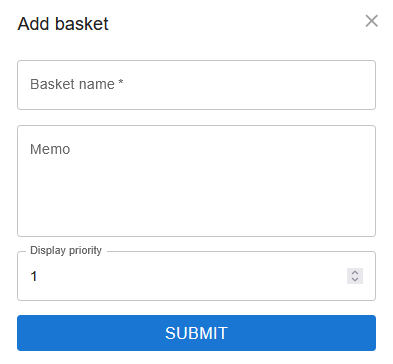 Enter the basket name, memo, and display order.
You can give the basket any name you like.
Display order can only be set from 1 to 9.
- Added baskets can be deleted by clicking the trash icon. When a basket is deleted, the packets inside are moved to the trash.
About Packets
A packet is the minimum unit of each piece of data. A packet is a single JSON object.
Packets can receive up to 100 items, and additional monthly fees apply for more. If the number of packets held exceeds the contract, no more packets can be received (existing packets are not deleted).
Sending Packets
To send a packet, click the "New Packet" button on the address screen.
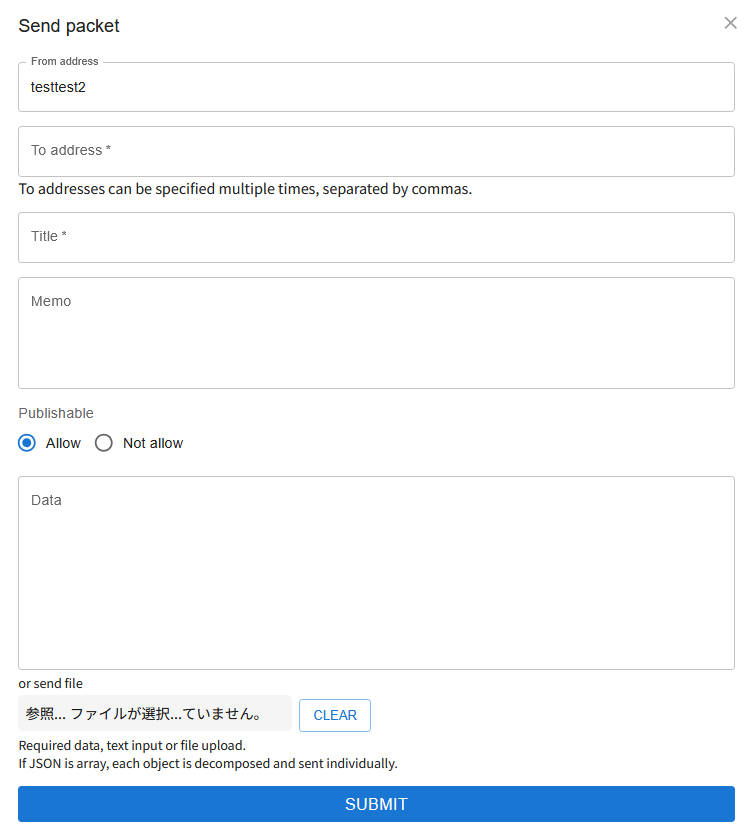
-
From Address:
This will be the currently displayed address. It cannot be changed. -
To Address:
You can specify multiple addresses separated by commas. -
Title:
This will be the packet title. -
Memo:
This will be the packet memo. -
Data:
Enter directly in the text area or upload a JSON file. Only one can be entered.
Based on the principle that a packet is a single JSON object, if a JSON array is entered, it will be split into individual JSON objects and sent as multiple packets.
Packets can also be edited. To edit, click the "Edit" button in the upper right.
Sent packets from the past can also be edited.
Sending Packets via API
API access uses URLs like the following.
https://packetsbase.net/api/post (POST)
Submissions are accepted via POST method. The body parameters required for sending are as follows.
-
apiKey:(Required)
Specify the post API key of the sending address. Please note that "K" in "apiKey" is uppercase. -
fromAddress:(Required)
Specify the sending address.
-
toAddress:(Required)
Specify the receiving address.
-
title:
Specify the packet title.
-
memo:
Specify the packet memo.
-
isPublishable:(Required)
Specify whether to publish the packet as a boolean.
-
data:(Required)
Specify the packet data in JSON. File uploads are not possible.
For security against unauthorized access, a 403 error will occur if there are a certain number of incorrect accesses such as wrong API keys.
Filter
Filters are settings to automatically distribute emails to baskets when received.
Screen Description
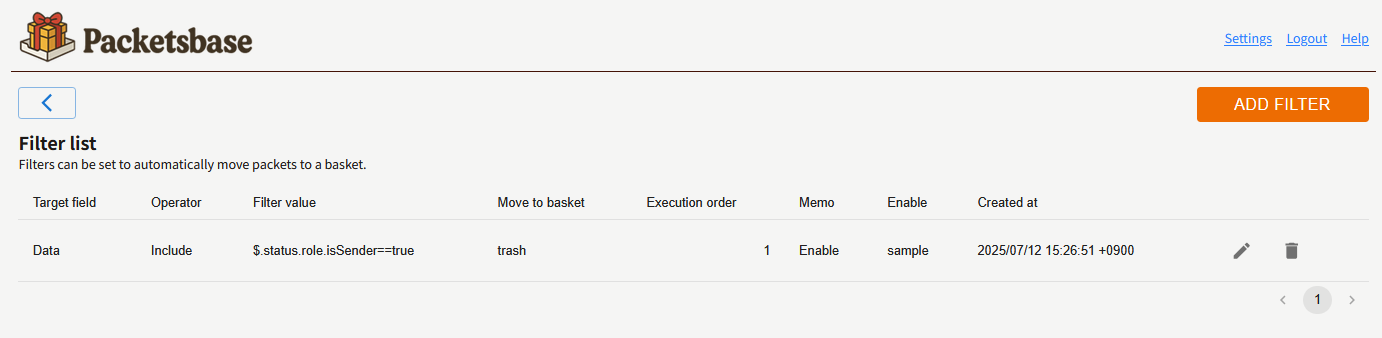
- Click the "<" button in the upper left to return to the address screen.
- Click the "Add Filter" button in the upper right to add a filter.
- The filter list is displayed below.
- Click the "pen" icon to edit the filter.
- Click the "trash" icon to delete the filter.
Adding Filters

- "Target Field" selects which of title, memo, data, or sending address to target.
- "Condition" can select whether it matches or doesn't match the "Possible Values" below.
-
"Possible Values" include the following.
Example: product info&company
- When filtering by title, memo, or sending address, enter keywords directly.
- You can narrow down search conditions by separating them with "&".
- When filtering by data, enter in JSONPath format.
- The left side "$.status.role.isSender" part can specify the packet data target in JSONPath format.
- "==" indicates equality with the right side content. Specifying "!=" can filter non-equal items.
- "Destination Basket" selects the basket to automatically assign when the filter matches.
- "Enable/Disable" sets whether to enable or disable the filter.
- "Execution Order" can specify the order in which filters are executed.
API Publication
We will explain how to publish APIs.
API Publication Settings Screen Description
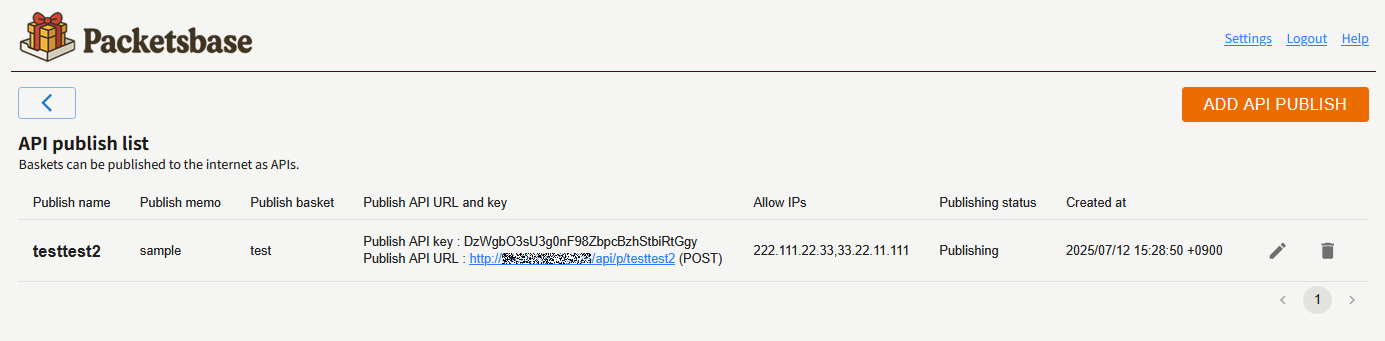
- Click the "<" button in the upper left to return to the address screen.
- Click the "Add API Publication" button in the upper right to add a public API.
- The public API list is displayed below.
- Click the "pen" icon to edit the public API.
- Click the "trash" icon to delete the public API.
Adding API Publications
One public API can be published for free, and monthly fees apply for each additional one.
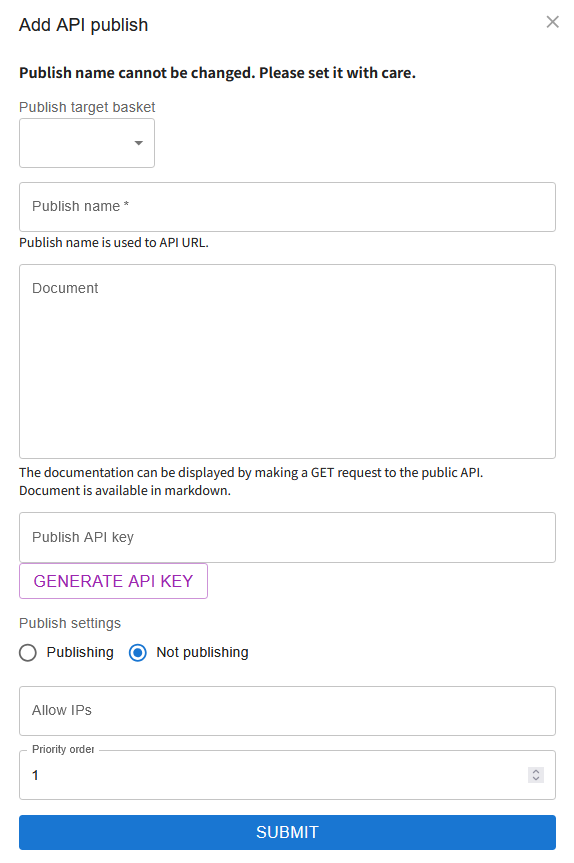
-
Publication Target Basket:
Select the basket that will be the target of the public API.
Public APIs can publish packets within baskets.
-
Publication Name:
Enter the public API name using lowercase letters, numbers, hyphens, and underscores, at least 8 characters.
Once registered, the publication name cannot be changed. Also, please note that the same publication name cannot be used again even if deleted.
-
Document:
Enter the public API document.
The document can be entered in Markdown format.
The document is displayed when the public API is accessed via a GET request.
-
Public API Key:
Specify the public API key. If the public API key cannot be presented during access, a 401 error will occur.
-
Publication Settings:
Set whether to enable or disable the public API.
-
Allowed IP Addresses:
Specify IP addresses allowed to access the public API. Multiple addresses can be specified separated by commas. Access from IP addresses other than these will result in a 403 error.
How to Access the API
API access uses URLs like the following.
Example: https://packetsbase.net/api/p/[publication name] (POST)
Access is accepted via POST method. The body parameters provided during access include the following.
-
apiKey:
Specify the public API key. Please note that "K" in "apiKey" is uppercase. -
query:
Specify the search query.
Example: product info&company
- When searching titles and memos, enter keywords directly.
- You can narrow down search conditions by separating them with "&".
- "opened" can filter read packets.
- "unopened" can filter unread packets.
- "publishable" can filter publishable packets.
- "unpublishable" can filter non-publishable packets.
- When searching data, enter in JSONPath format.
- The left side "$.status.role.isSender" part can specify the packet data target in JSONPath format.
- "==" indicates equality with the right side content. Specifying "!=" can filter non-equal items.
-
sort:
Specify the field to sort by. "asc" is ascending order (1→100) and "desc" is descending order (100→1).
-
number:
Specify the number of packets per page.
-
page:
Specify the page number to display.
For security against unauthorized access, a 403 error will occur if there are a certain number of incorrect accesses such as wrong API keys or access from non-allowed IP addresses.
Limits and Contracts
The limits that can be used in the initial state (within the free usage range) are as follows.
- Addresses: 1
- Baskets: 2
- Packets: 1000
- Public APIs: 1
- Filters: 2
If you want to handle more data than this, you can increase the limits by adding contracts.
Additional contracts can be made for two items: number of packets handled and number of public APIs.
- The fee for additional contracts for number of packets handled is USD 4.00/month (tax included) for every 10,000 packets added.
- The fee for additional contracts for number of public APIs is USD 4.00/month (tax included).
When the contract period expires and limits are lowered, the following states occur.
-
Addresses:
When the number of addresses falls below the address limit, access will be disabled from the lower display order.
Packet reception will also be disabled.
Data within addresses will not be deleted.
-
Number of Packets Handled:
When the packets held by the account reach the packet handling limit, no more packets can be received.
Also, packets that can be published via public APIs are limited to the packet handling limit.
However, packets held by the account will not be deleted (they will be displayed in the packet display screen).
-
Public APIs:
When the number of public APIs falls below the public API limit, public APIs will be disabled and access will be impossible.
Public APIs will not be deleted.
Terms of Service
Thank you for using "Packetsbase" (hereinafter referred to as "this service") provided by HARMONICOM (hereinafter referred to as "we"). Users (hereinafter referred to as "users") will use this service in accordance with these terms.
User Registration
User registration is completed when we approve a registration application from an applicant. We may not approve registration applications if we determine it is inappropriate, such as when there has been a violation of these terms, and we will not disclose the reason.
User Name Management
Users are responsible for managing their login ID and password for this service. To protect your username, please do not share your password with others.
Also, users may not transfer or lend their login ID and password to third parties under any circumstances. We will consider that the username is being used by the user themselves when the combination of login ID and password matches the registered information and login occurs. If you notice that your username is being used improperly, please report it to us immediately.
Use of This Service
Users must not engage in improper behavior when using this service. For example, you must not engage in behavior that destroys or interferes with our servers or network functions. If we determine that a user's behavior is improper, we may restrict the user's use of this service or delete their user registration without prior notice. We are not responsible for any damages caused to users by such usage restrictions.
Fees and Payment Methods
Users shall pay the usage fees that we set and display on our website to us by the method we specify as consideration for using this service, and we will not refund usage fees once received for any reason.
Protection of Personal Information
Our privacy policy describes how we handle users' personal information. Users agree to use this service with the understanding that we will use their personal information in accordance with this privacy policy.
Suspension of Service Provision
We may suspend or interrupt the provision of this service without prior notice to users when we determine that it is difficult to provide this service, such as when performing maintenance, inspection, or updates of computer systems related to this service. We are not responsible for any disadvantages or damages suffered by users or third parties due to the suspension or interruption of this service, regardless of the reason.
Disclaimer of Warranty and Limitation of Liability
We provide this service with reasonable care, but we do not guarantee that this service is free from factual or legal defects (including defects, errors, bugs, and rights violations related to safety, reliability, accuracy, completeness, effectiveness, suitability for specific purposes, security, etc.).
Also, we are not responsible for any damages caused to users by this service. Even when we are legally liable, we are not responsible for any damages caused to users due to special circumstances.
Changes to Service Content or Terms of Service
We are constantly changing and improving this service, so we may delete data, change the content or terms of use of this service, or discontinue the provision of this service without notice to users. We are not responsible for any damages caused to users by these actions.
We may change these terms without individual user consent in the following cases.
- When the change to these terms is suitable for the general interests of users.
- When the change to these terms does not violate the purpose of the service usage contract, and the change is reasonable in light of the necessity of the change, the appropriateness of the content after the change, and other circumstances related to the change.
We will notify users in advance of the intention to change these terms, the content of the terms after the change, and the effective date of the change.
Notices or Communications
Notices or communications between users and us shall be made by the method we determine.
Governing Law and Jurisdiction
Japanese law shall be the governing law in interpreting these terms.
In the event of a dispute regarding this service, the Tokyo District Court or Tokyo Summary Court shall be the exclusive agreed jurisdiction.
Established July 7, 2025
HARMONICOM